You've got a landing page to ship, an ad set waiting on creative, and a folder of AI images that look great as thumbnails. Then you zoom in. The label says something that isn't your product name, a hand has the wrong shape, and the bottle is a color you don't sell. Learning how to generate images with AI isn't really about getting one lucky result. It's about building a short loop of prompting, batching, reviewing, and repairing until an image can survive a real page.
Table of Contents
- How to Generate an AI Image in Six Steps
- Picking a Model or Tool for Your Image Type
- Writing Prompts an Image Model Can Follow
- Fixing Images That Are Almost Right
- Checking Images Before They Reach Ads and Pages
- Confirm Disclosure and Rights Before You Publish
How to Generate an AI Image in Six Steps
A usable AI image comes from a short loop of prompt, batch, and review, so plan for 10 to 20 minutes rather than one lucky generation. That mindset changes everything. You're not hunting for a perfect first output. You're producing candidates, rejecting most of them, and fixing the strongest one.
Use a concrete job to keep decisions honest. Say you need a landing page hero for a skincare brand, a glass dropper bottle on a bathroom shelf, with space on the right for a headline. Every step below answers a question that image has to pass.
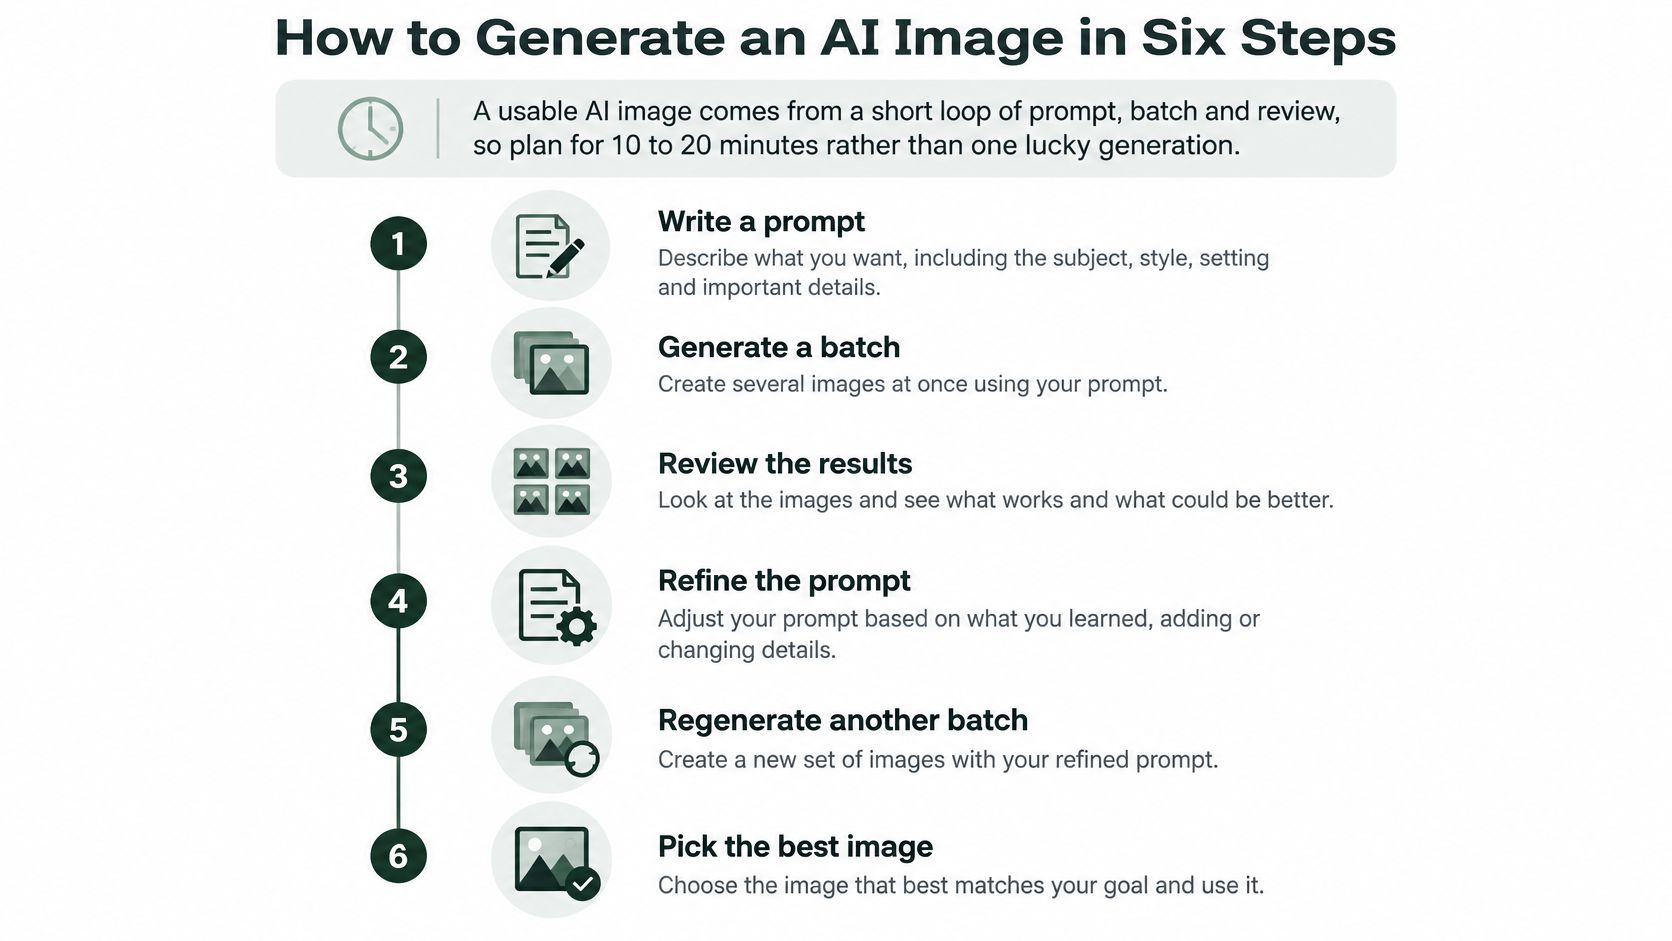
The Six Step Loop
Write the brief first. Name the subject, the two or three attributes that matter, where the image will sit, and the job it does on the page. Pick the aspect ratio now, 1:1 for feeds, 4:5 for vertical paid social, or 16:9 for a landing hero, because cropping later often cuts the product or the whitespace you needed. For the skincare hero, that brief is one bottle, pale stone shelf, soft bathroom light, empty space right, 16:9.
Pick a tool that fits the image type. Don't start from your favorite app. Start from whether the product has to match reality, whether you're editing a real photo, or whether you're only setting a mood. A mood image can be pure generation. A product hero usually can't.
Write a first prompt with one primary subject. Keep modifiers few and specific. "A glass dropper bottle on a pale stone shelf, soft window light from the left, shallow depth of field" gives the model a clear center. Stacking ten adjectives and three scenes into one prompt mostly creates confusion you will pay for in cleanup.
Generate four to eight candidates. Vary the seed where the tool allows it and keep other settings fixed, so you can see what the prompt is doing. One image tells you almost nothing. A batch shows you whether a flaw is random or built into your prompt.
Review at the size it will be shown. Check each candidate at native resolution, then shrunk to phone size. Reject anything with wrong object counts, garbled text, odd anatomy, invented logos, or a label you can't read. Thumbnails hide exactly the problems customers will spot in an ad.
Edit only the broken region, then export and log it. Inpaint a bad hand, a messy edge, or a distracting object instead of regenerating the whole scene and losing a composition that worked. Export at the target size and record the model, seed, dimensions, edits, and approval status so you can reproduce or revise it later.
Practical rule: If you can't describe why you picked the winner, you haven't reviewed it. You've just liked it.
What You End Up Holding
At the end you shouldn't just have one pretty file. You should have a repeatable loop, a prompt you can reuse, a short reject list that teaches you what this model gets wrong, and one finished image that's ready for a proper product and rights check. That's the difference between playing with a generator and shipping creative. I would rather have six average candidates and a clear winner than one dramatic image I can't trust, can't reproduce, and can't fix without starting over.
Picking a Model or Tool for Your Image Type
| Option | Best for | Main limit | Extra check before publishing |
|---|---|---|---|
| Text-to-image web app | Concept exploration and mood boards | Weak control over exact product details | Human review pass for every candidate |
| Open-weight diffusion model | High volume and custom styles | Setup effort and hardware needs | Confirm the model license allows commercial use |
| Image editor with generative fill | Changing backgrounds or removing objects | Can alter areas you did not select | Compare the edited area against the original |
| Reference-guided generation | Product scenes built from a real packaging photo | Labels still need compositing | Check labels against the source file |
Read the table by image type, not by brand name. If you're still exploring directions for a campaign, a text-to-image web app is fastest. You'll get mood, composition, and style quickly, and you can throw most of it away without losing money. Don't ask it to nail your exact carton, cap shape, or ingredient panel. That's not what it's good at.
If you need volume or a house style you can repeat across dozens of pages, an open-weight diffusion model gives you more control and fewer usage limits. The trade-off is real. Someone has to set it up, run it on capable hardware, and manage versions. That's worth it for a team producing creative every week, and it's overkill for a single hero image.
The Decision Rule That Saves Time
If the product must match its real appearance, start from a photo. If the image only sets a mood, generation alone is enough.
That rule points you to generative fill when you already own a good photo and need a cleaner background, a wider crop, or an object removed. It points you to reference-guided generation when you want a new scene around real packaging. Even then, plan to composite the label from the source file. Models are happy to invent plausible looking text that says nothing, or worse, says the wrong thing.
For a lifestyle image with no product detail, a single web app is usually the fastest path. For product led work, the comparison in Landra's photo tool picks for DTC is a useful way to sort tools by the job. If you're still mapping families of models to the kind of output you need, this guide to help you find the right AI model gives useful context before you commit to a workflow.
Name the image type first, then the tool. "Vertical paid social lifestyle, no readable packaging" leads to a different choice than "hero with exact bottle and label." Most wasted generation time comes from skipping that sentence.
Writing Prompts an Image Model Can Follow
A prompt works best as a structure you fill in order, not a wish list. Start with the visual below, which shows how a vague request becomes an instruction a model can follow.
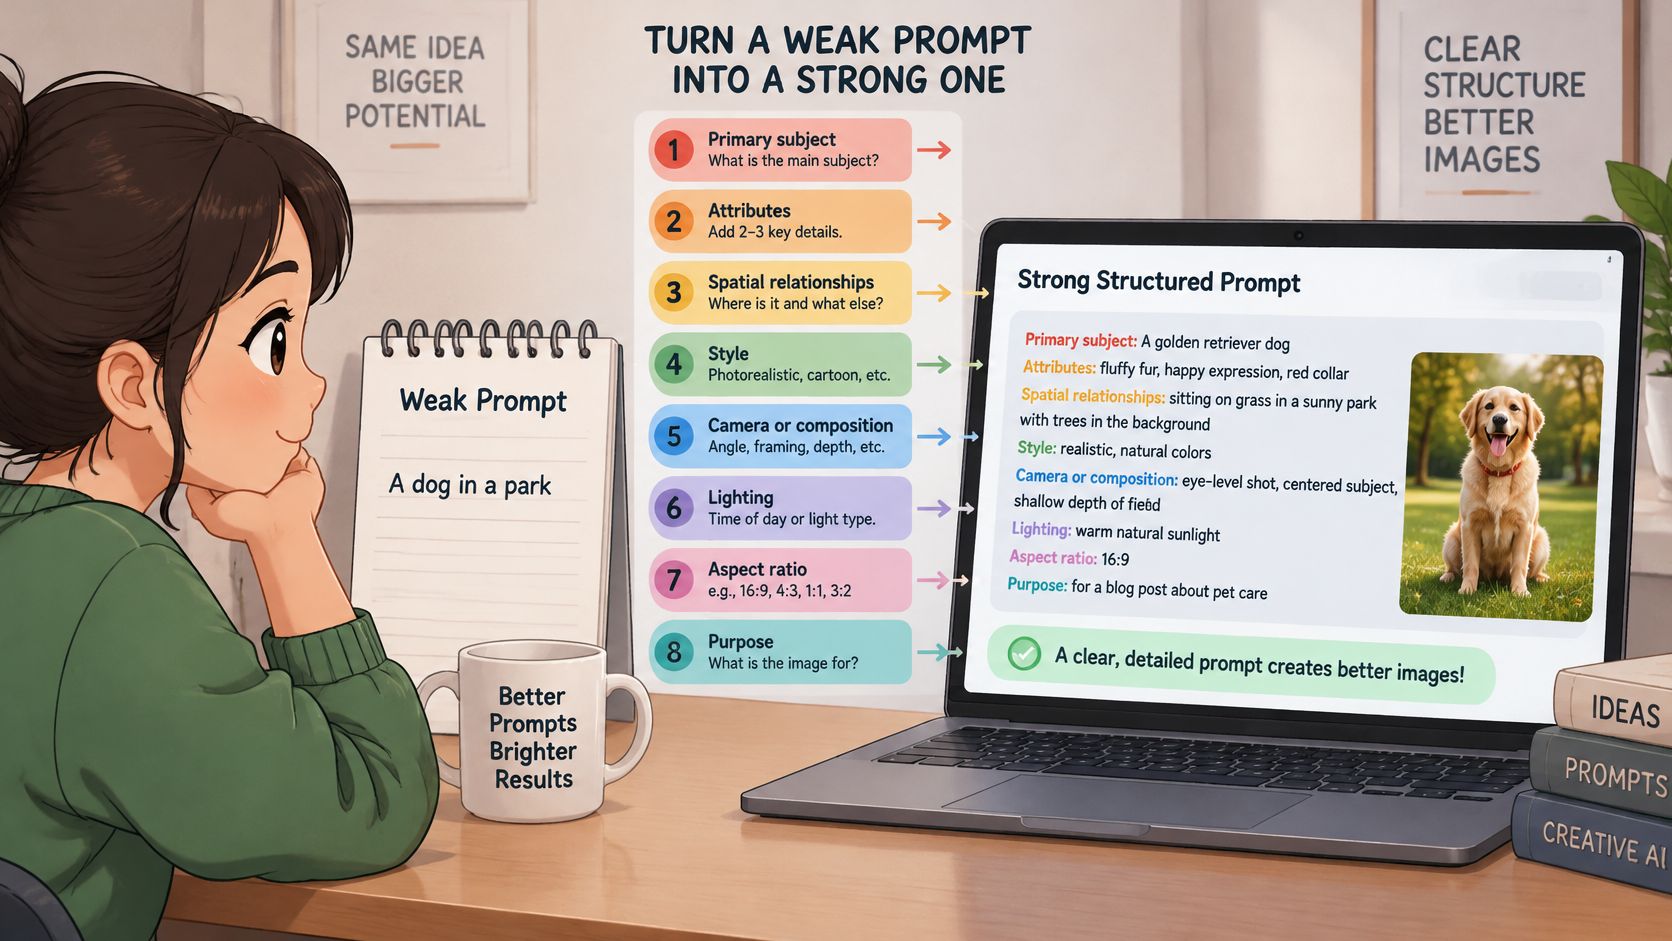
Compare these two prompts for the same skincare hero.
- Weak prompt: "a nice skincare ad image, no clutter"
- Stronger prompt: "a glass dropper bottle on a pale stone shelf in a bathroom, soft window light from the left, shallow depth of field, empty space on the right for a headline, 16:9 landing hero"
The second prompt narrows the result element by element. The primary subject comes first, then two or three attributes, then spatial relationships such as light from the left and space on the right. Style, camera or composition, lighting, aspect ratio, and purpose close the instruction. Each added element removes a guess the model would otherwise make for you.
Phrase Requirements Positively
Don't tell the model what to avoid and expect obedience. Write "a clean white background" instead of "no background clutter." In a 4,800-prompt negation benchmark, 41.5% of failed statements rendered exactly what the prompt prohibited, while negated color constraints produced particularly large performance losses, according to the MDPI study on negation in text-to-image prompts. That's not a small quirk. If color matters for your brand, a negated color instruction is one of the fastest ways to get the wrong result.
Isolate hard constraints in a separate pass. Generate the scene first, then fix a color, swap a background, or add the label afterwards. When exact packaging, logos, or ingredient labels matter, generate the product and scene separately and composite the product in. The same discipline of naming subject, style, and placement in a fixed order helps in other visual briefs too, which is why guides that help you write clearer prompts for tattoo concepts use a similar slot based structure.
A Template You Can Reuse
Save this and fill the slots every time.
[brand colors] [product description] on [surface], [lighting], [camera angle], [required whitespace], [aspect ratio], [purpose]
Watching a prompt being built and revised live often makes the order stick faster than reading it.
Test the template properly. Write three variants that each change one element, generate a batch of each, and note which change moves the output. If you change lighting, surface, and camera angle at once, you'll learn nothing you can reuse on the next page.
Fixing Images That Are Almost Right
Rejection isn't a sign your workflow failed. In a CVPR 2024 human-feedback study built from 18,000 image-text pairs, only approximately 10% of generated images were free of artifacts and implausibility. Plan for that. Most candidates should die in review, and the survivor will usually still need a repair.
The most common failure is simple. The image looks right at thumbnail size and falls apart at full zoom. Your eye won't reliably save you either. People identified AI images correctly only 29% of the time for FLUX.1-dev outputs, and Adobe's 2025 global creator survey found unreliable output quality was a leading adoption barrier for 34% of creators, according to the Frontiers in Artificial Intelligence review of AI image detection and quality. Zoom into hands, faces, and type before you judge anything.
| Symptom | Likely cause | Fix |
|---|---|---|
| Extra or missing fingers | Hands are small and low detail in the frame | Crop tighter, inpaint the hand, or regenerate with hands out of frame |
| Garbled words on packaging or signs | Models render text poorly | Generate without text and add copy in a design tool |
| Wrong label or logo | The model invents product details | Composite the real product photo over the generated scene |
| Face looks asymmetrical | Faces vary across a batch | Regenerate the face region or use a real model photo with consent |
| Duplicated objects | The prompt leaves the count ambiguous | State the exact count and remove extra modifiers |
| Background pulls attention | The scene is too busy | Specify a clean background and crop closer |
Repair in This Order
First, try the cheapest fix. Crop tighter or regenerate with the problem out of frame. A hand you don't need is easier to remove than to repair. Next, mask and inpaint only the defect, so the parts that work stay untouched. For text, stop asking the generator to spell. Generate a clean surface and add real copy in your design tool, where you control font, spelling, and claims.
For people shots in particular, small cues in skin, light, and framing decide whether an image reads as a photo or a render, and these prompt tricks for lifelike AI photos are worth borrowing when realism is the whole point. Even then, check symmetry and edges at high zoom. Synthetic humans still show anatomical oddities that a quick glance misses.
Stop regenerating when the same flaw repeats across five or six attempts. That pattern means the model is wrong for this image, not that your next prompt will save it.
Some jobs shouldn't go to AI at all. Don't use generated imagery for regulated product claims, medical imagery, or exact packaging replication, or anywhere a small visual error can damage trust or mislead a buyer. At that point your real choice is to repair the image, reshoot it, or switch tools. I would reshoot sooner than many might expect.
Checking Images Before They Reach Ads and Pages
Making an image and clearing it for an ad are different jobs. The checklist below is the pass that happens after you think you're done.
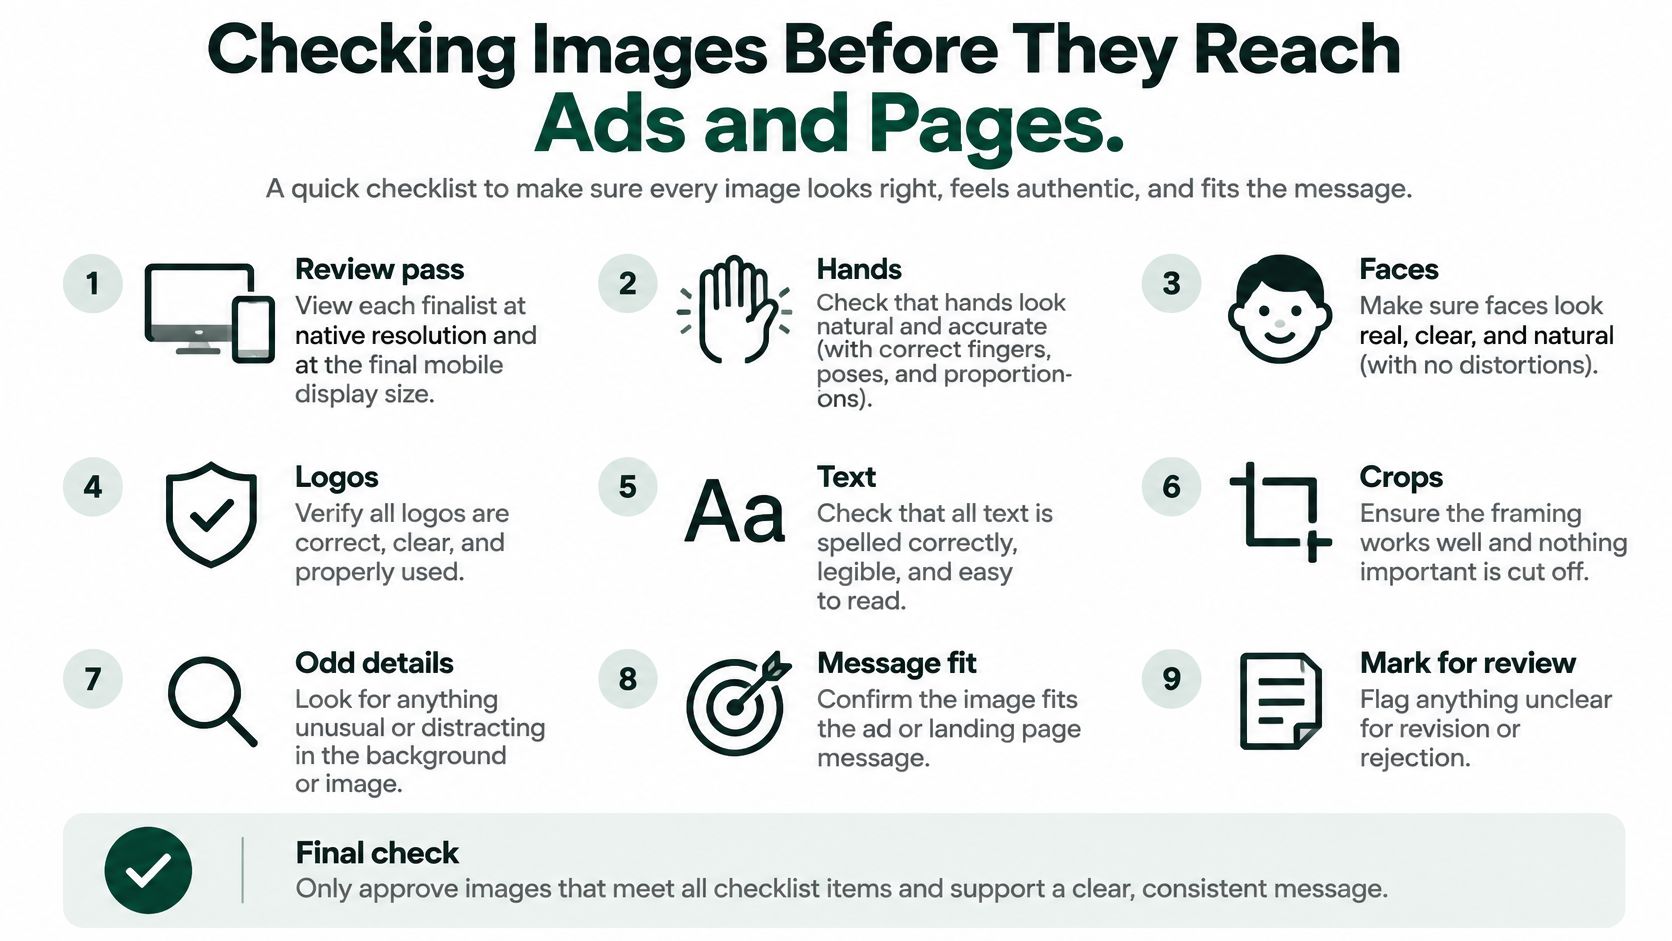
View each finalist at native resolution and at the final mobile display size. Check hands, faces, edges, reflections, small typography, repeated objects, and any unintended brand or cultural cues. Then run a side by side human preference test on the survivors and make reviewers pick based on usefulness, not just which face looks most attractive. Attractiveness is a poor proxy for whether an image sells the right product accurately.
Product Fidelity Beats Visual Drama
AI-generated images are artistic interpretations and may not accurately depict a product's appearance, packaging, color, ingredients, scale, or any actual person. Treat that as an operating rule, not fine print. Compare every product-facing image against the actual item before it appears in an ad or on a page. If the bottle is taller, the shade is warmer, or the label promises an ingredient you don't use, the image fails, however beautiful it looks.
Prioritize accurate product appearance, readable composition, and consistency across a page over a dramatic but misleading scene. A hero, a listicle image, and a testimonial visual that each show a slightly different product teach shoppers not to trust any of them.
| Placement | Aspect ratio |
|---|---|
| Feed image | 1:1 |
| Vertical paid social | 4:5 |
| Landing page hero | 16:9 |
Export Like Someone Will Audit It
Set the ratio for each placement using the table, and check the 2026 Facebook ad file limits before you export paid social files. Export a copy at each placement size from the largest master file, name each file by page and variant, and compress for mobile load time. Don't upscale a small feed image into a hero and hope nobody notices.
Use this pass or fail list before anything ships.
- Product match: Shape, color, label, and scale match the item.
- Detail check: Hands, faces, text, edges, and reflections survive zoom.
- Placement check: Crop and whitespace work at phone size.
- File check: Correct dimensions, clear filename, master file saved.
You end with a set of exports that match the product and hold up on a phone sized screen. Anything that fails one line goes back for revision or gets rejected. There's no partial pass for customer facing creative.
Confirm Disclosure and Rights Before You Publish
An AI image goes live only after its disclosure, rights, and product checks pass. Looking convincing isn't the same as being cleared to publish. In the Clutch AI imagery survey, 84% of surveyed consumers said disclosure of AI imagery is important, and nearly 40% said undisclosed use would reduce their trust in a brand. On the creator side, 69% worry that their work is being used to train AI without permission, while 28% cite uncertainty about how models were trained as an adoption barrier. Your audience and your peers are both asking where these images came from.
Separate two things that get confused. A visible label tells a person an image is synthetic or materially altered. Machine-readable provenance, such as a credential or watermark, can indicate likely AI processing, but it doesn't prove ownership, authorship, accuracy, or legal clearance. Don't treat a watermark check as a rights check.
Run this before launch, including on pages built with Landra, where our Shopify landing page output includes AI copy and AI images. You own the content you create or edit with the Service, including generated pages, edited copy, and uploaded images, but that ownership doesn't clear a third party model, a reference photo, or a recognizable person for you.
- Disclose material AI alterations where audience expectations or local rules require it, and remember labeling rules are still changing by market.
- Avoid identifiable people without consent.
- Keep prompts, seeds, and source assets so you can show how an image was made.
- Check model and platform terms for commercial use before an image enters paid media.
The same habit of reviewing what you publish and how it performs applies after launch, which is why it helps to measure your ecommerce UGC performance alongside AI creative instead of judging either in isolation. Then make one of three choices for each image. Publish as is, add a visible disclosure, or replace it with a real photo. If you can't defend the first two, pick the third.
If you're generating product images for advertorials and listicles, Landra can turn a product URL into a mobile-first pre-sell page with AI copy and AI images placed in the page, ready for you to edit inline and publish to Shopify, a Landra URL, or HTML. Run the review, repair, and disclosure checks above on every image before launch, then start your first page and ship creative you can confidently defend.