
We generate images for DTC landing pages inside Landra every day, and the thing that surprised us most is how few of them are product shots.
Search "how to make AI product photos" and almost every guide teaches the same single skill: get a clean, accurate photo of your bottle. That's a real skill, and it's the smallest of the jobs your page's images actually do. A page that converts cold traffic needs images that name the reader's problem, show them the payoff, and sell a life they want, and most of those never show your packaging at all. This guide covers all four jobs, the craft for each, and the one place where "keep your product accurate" really is the whole game.
It's tool-agnostic — the technique works in Gemini, Midjourney, or a dedicated tool like Photoroom — and if you want the model-by-model breakdown, see our best AI product-photo tools for DTC brands.
Why your images do more work than your copy
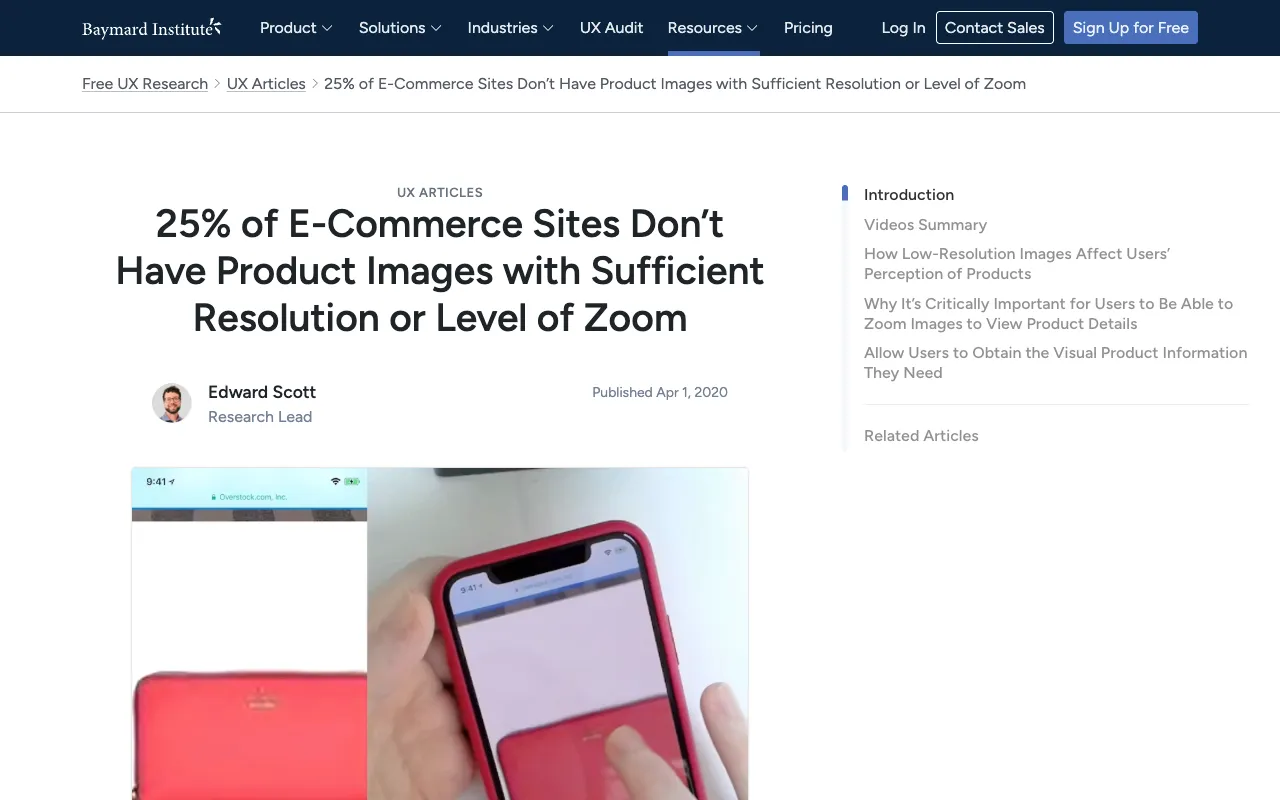
On a cold-traffic page, images carry more conversion weight than the words, because shoppers look before they read. According to the Baymard Institute (2020), in usability testing "56% of users' first actions were to immediately begin exploring product images" after landing on a product page — before the description, before the price. Baymard also found that 25% of e-commerce sites provide product images insufficient for shoppers to actually evaluate the product.
Here's the part that research number hides, though, and that we only really understood once we were generating images for thousands of pages: "exploring product images" doesn't mean staring at the bottle. On an advertorial or listicle built for cold traffic, the images that do the persuading are mostly not the product. They are the images that make a stranger feel something before they're asked to buy.
The four jobs a DTC page's images do
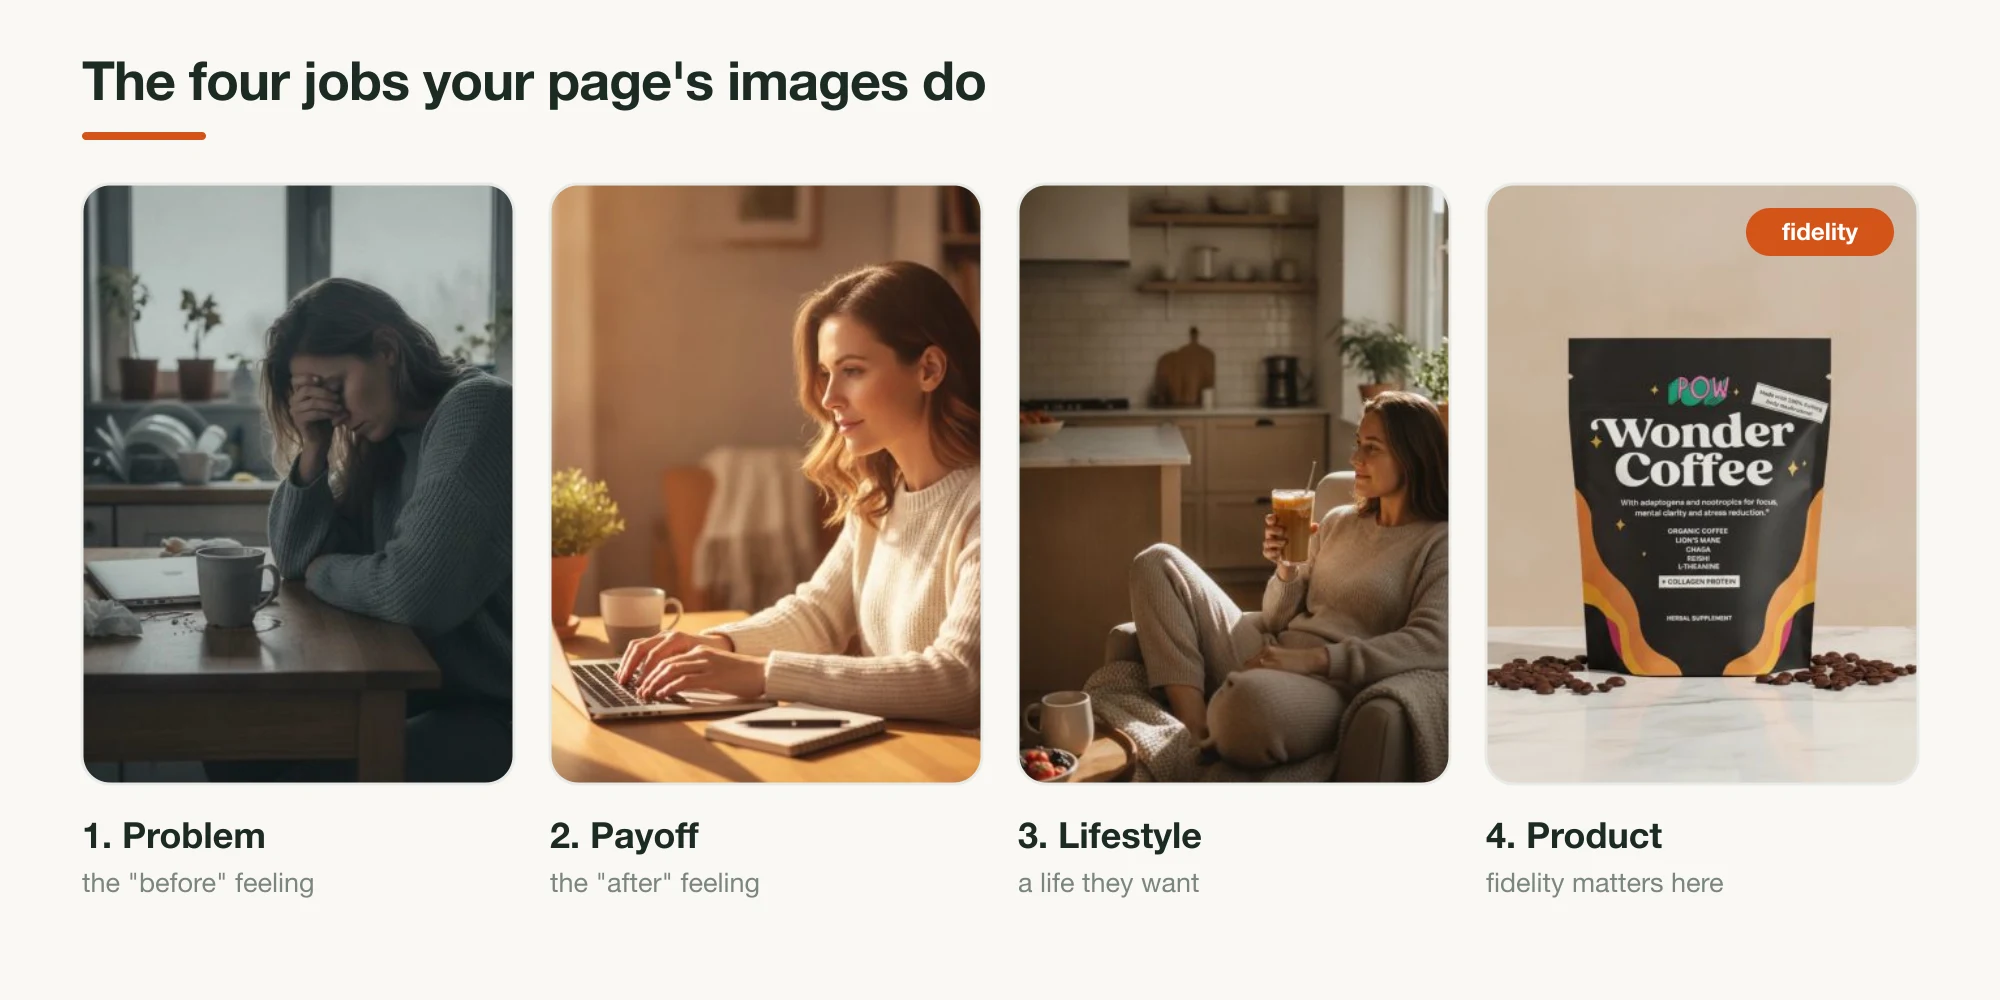
Every image on a converting page is doing one of four jobs. Name the job before you write the prompt, and the prompt writes itself:
- Dramatize the problem. The "before": someone tired, foggy, frustrated, defeated by the thing your product fixes. No packaging in frame. This is the image that makes a problem-aware reader think that's me, and it's the one most DTC pages are missing entirely.
- Show the payoff. The "after": the same person focused, energized, calm, in control. It sells the outcome, not the ingredients. Pair it with the problem image and you've told the whole story in two frames.
- Sell the lifestyle. The product woven into a life the reader aspires to: the coffee enjoyed on a sunny morning, not the bag on a shelf. The packaging can be present but it's secondary; the feeling is the point.
- Show the product. The accurate hero/catalog shot, the one place where the label, cap, and proportions have to be exactly right, because this is the image a shopper zooms in on to decide what they're actually getting.
Here's the call we'll defend, and it's where we part ways with every "AI product photo" guide: fidelity is the smallest of the four jobs. It's the one everyone writes about because it's the one with an obvious right answer (does the label match or not?). But most pages don't lose because the bottle was slightly wrong; they lose because there was no problem image, no payoff image, nothing on the page that made a cold visitor feel anything before the pitch. AI is genuinely useful for all four jobs. Spend your effort where the page is actually weak.
Jobs 1–3: the images that don't show your product
The problem, payoff, and lifestyle images are mood and emotion images, and they're judged on a completely different axis than the product shot. Fidelity is irrelevant here; there's no label to preserve. What matters is whether the image reads as true to the reader's experience and stays on the honest side of the line.
Three things make these work:
- Cast a specific person and moment, not a stock archetype. "A tired person" gives you a glossy model pretending to yawn. "A woman in her 30s slumped at a kitchen table in flat 7 a.m. light, rubbing one eye, a half-finished coffee going cold beside her laptop" gives you something a real reader recognizes. Specificity is what separates a scroll-stopping problem image from a stock photo.
- Match the emotional temperature to the job. Problem images want muted color, flat or grey light, a little tension. Payoff and lifestyle images want warmth, brighter light, ease. The shift in light between your "before" and "after" image is the story.
- Keep it on-brand and honest. Same palette and mood as the rest of your page, and — this is the one hard rule — these are illustrative, not evidence. An illustrative lifestyle image is fine; a generated "customer" with a fabricated quote, or a faked before/after result, is not. The FTC's Fake Reviews Rule (effective October 2024) covers AI-generated fakes, and the line is simple: depict a feeling, never manufacture proof.
Because these images don't have to match a real product, you don't need a reference image or a fidelity model for them; any capable generator will do. The skill is the brief, not the tool.
Job 4: the product shot, where fidelity is everything
This is the job the rest of the internet means by "AI product photo," and it's the one where the technique gets exacting, because the product shot is the only image where being 90% right is a failure. Building Landra's image pipeline, the failure that taught us the most wasn't bad lighting or an awkward scene; it was a generated bottle whose label said something almost, but not quite, like the brand's name. It looked great at thumbnail size and fell apart the instant anyone zoomed in. So this section is the discipline we built to kill those.
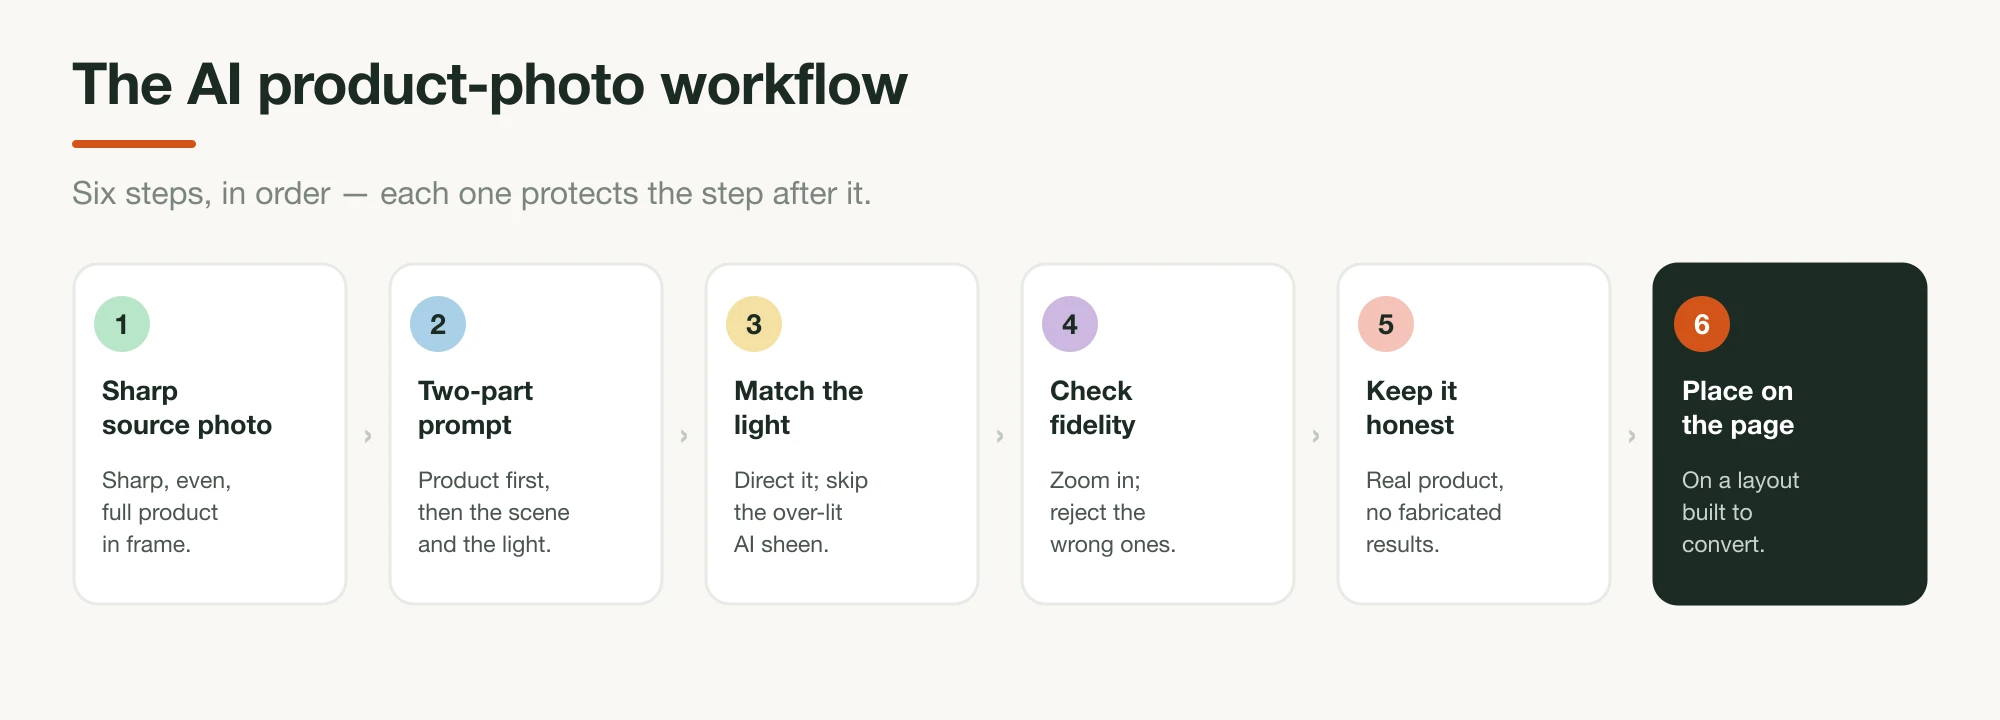
1. Start from a sharp, evenly-lit source photo
Everything downstream inherits the quality of the photo you start with. Before you write a single prompt, get the best possible reference shot of the real product: in focus, evenly lit with no harsh shadows hiding detail, plain background, the entire product in frame and the label fully readable. A phone photo in daylight near a window beats a dramatic studio shot here, because the model needs information, not mood.
This matters because of how the good tools work: you pass this photo to the model as a reference image, and it generates new scenes around your actual product instead of inventing one from the prompt text. A blurry, cropped, or dark source gives the model permission to fill in the gaps, and it will fill them with a product that isn't yours. (This is exactly the move behind the Wonder Coffee scenes in our tools roundup: one real pouch photo, restyled into a studio, a kitchen, and a held-in-hand shot, label intact each time.)
2. Write the prompt in two parts: product, then scene
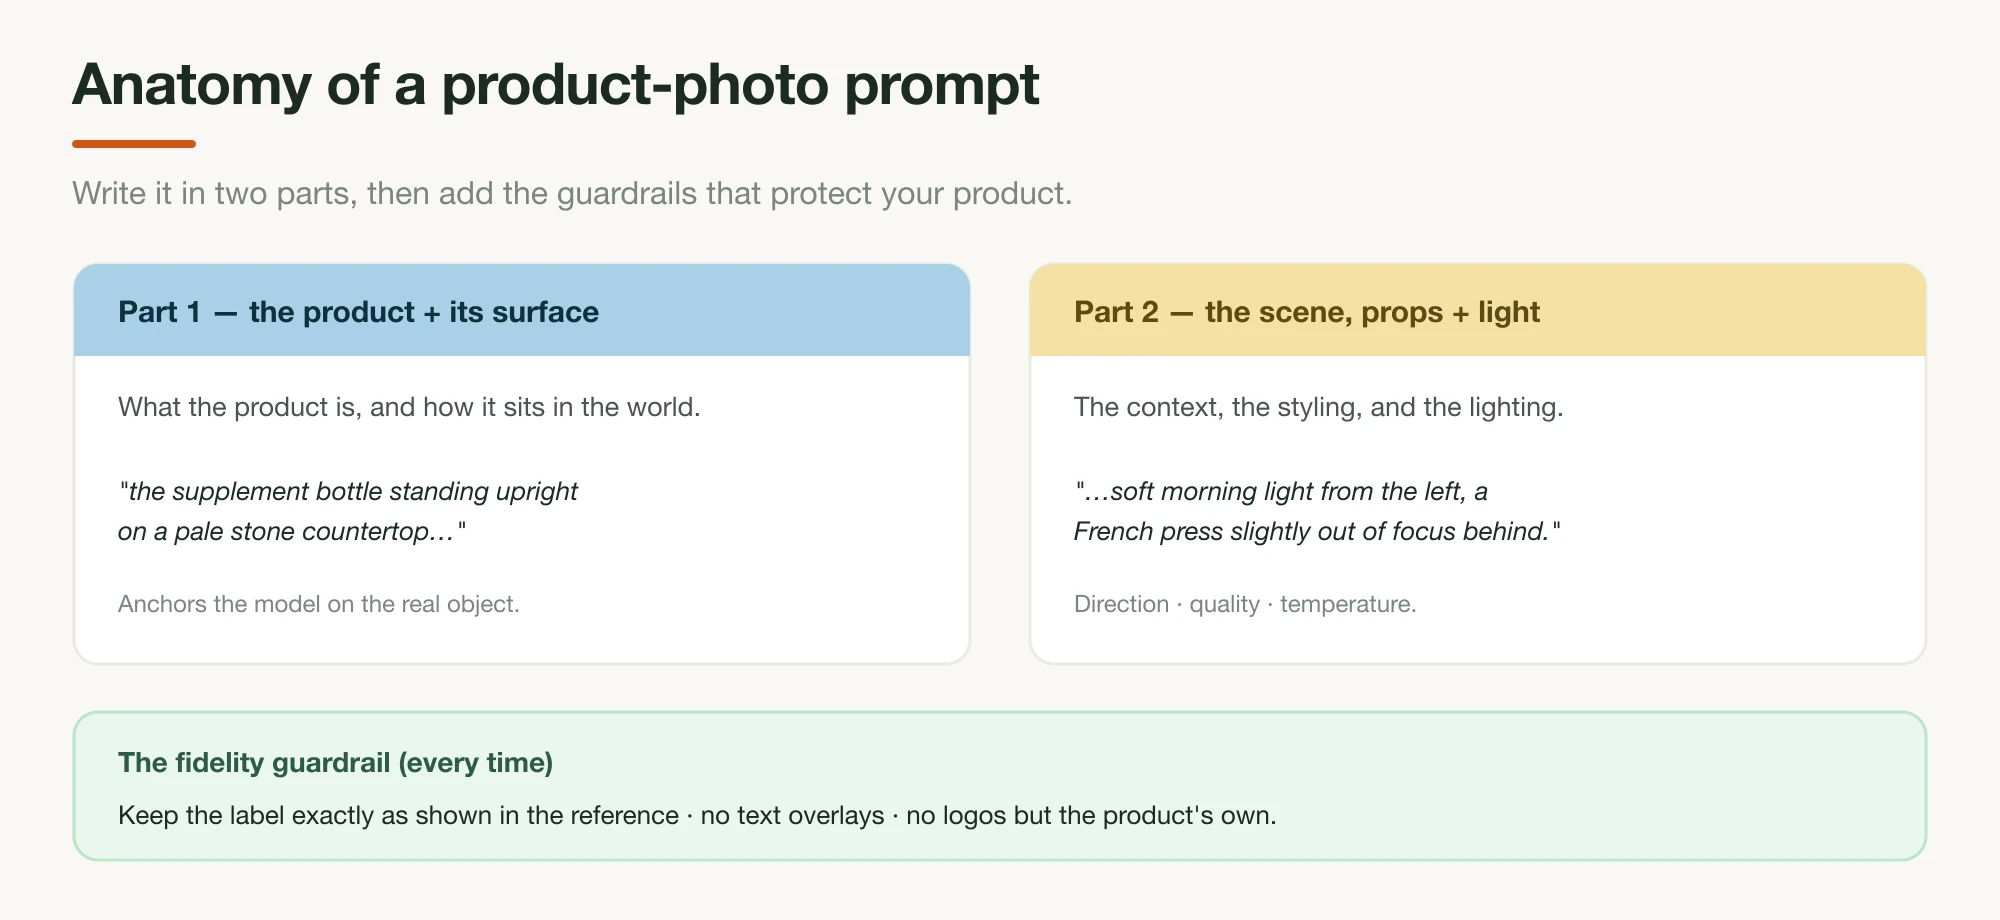
A good product-shot prompt is structured, not a run-on wish. Write it in two halves. First, the product and its surface: what it is and how it sits ("the supplement bottle standing upright on a pale stone countertop"). Second, the scene, props, and light: the context ("soft morning light from the left, a French press slightly out of focus behind it, shallow depth of field"). Then add the guardrails that protect fidelity: keep the label exactly as shown in the reference, no text overlays, no logos but the product's own. Generate in small batches and vary one thing at a time, so you can tell what actually changed the result.
3. Match the lighting to your brand, not the model's default
Lighting is what makes a generated shot read as real or as obviously synthetic. AI models, left alone, drift toward over-lit, glossy, "everything perfect" lighting: the AI sheen shoppers have learned to distrust. Name the light you want: direction ("from the left"), quality ("soft and diffused" vs. "hard"), temperature ("warm morning" vs. "cool studio"). Then match it to your brand's existing world; if your real photography is bright and airy, a moody scene will look like a different brand bolted onto your page. (This is the one tip that applies to all four jobs, not just the product shot.)
4. Judge on fidelity, and reject the pretty failures
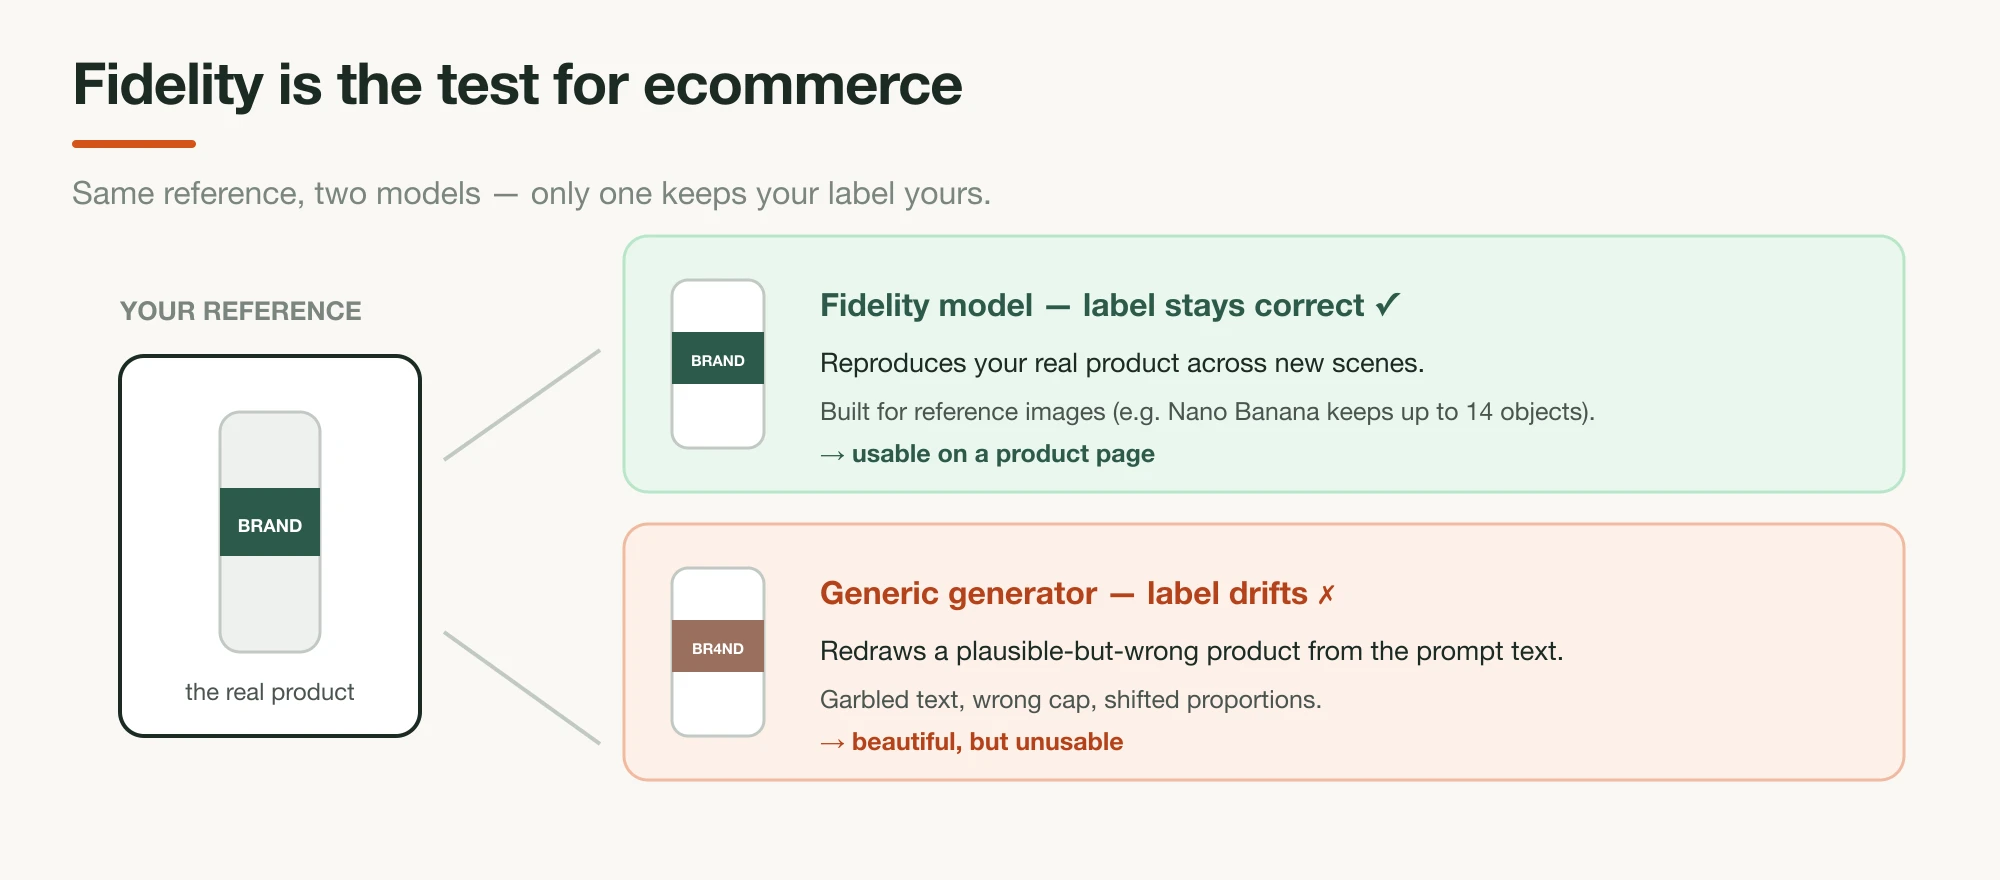
This is the discipline we run on every generation inside Landra, and it's the one most people skip: open each result at full size (not thumbnail) and check the places AI models break first: the label text, the logo, the cap, the proportions, fine packaging detail. A photo that's beautiful and 90% your product is a reject, because the 10% is precisely what a shopper zooms in on. Tooling helps here: models built for reference fidelity hold your product steady where general generators redraw it (Nano Banana Pro, for one, maintains the fidelity of up to fourteen objects in a workflow; the tools roundup covers which do and don't). But no tool removes the QC step.
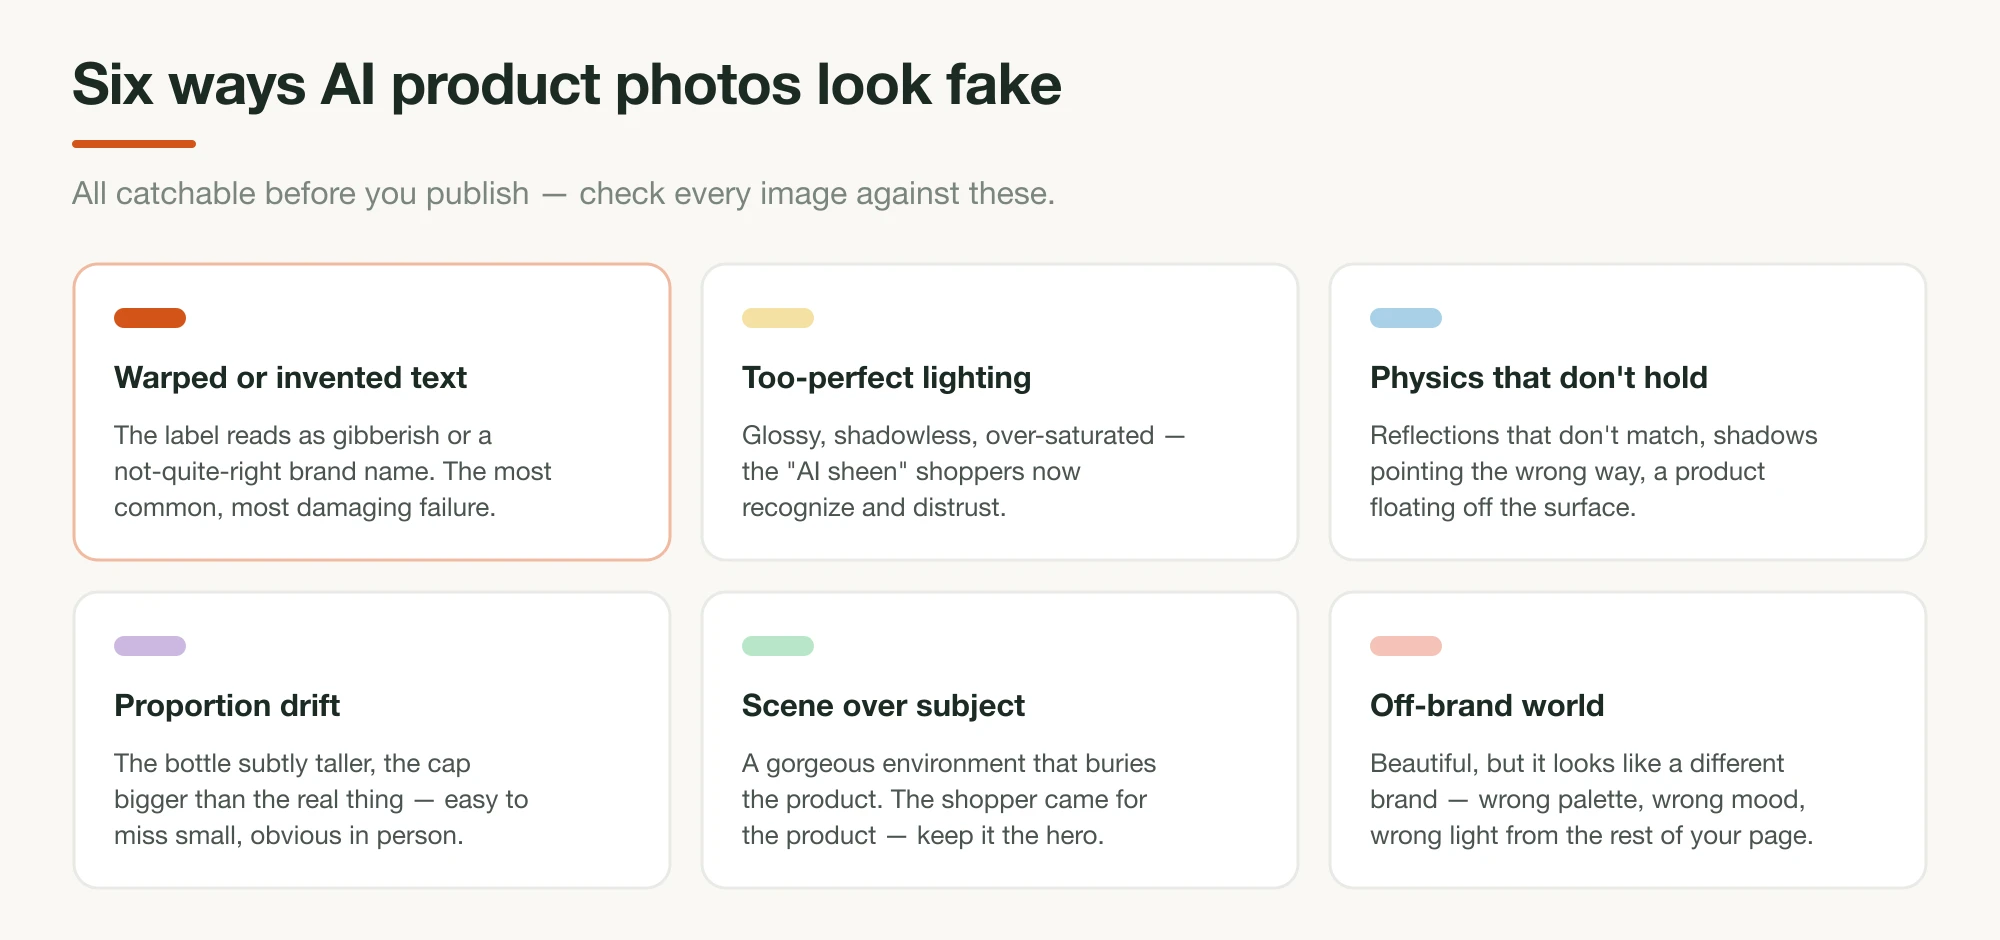
The product-shot failures cluster into six patterns, and after looking at a lot of generations they're easy to spot: warped or invented text (the label as gibberish — the most common and most damaging), too-perfect lighting (the AI sheen), physics that don't hold (wrong shadows, a floating product), proportion drift (a subtly taller bottle), scene over subject (a gorgeous environment that buries the product), and off-brand world (beautiful, but it looks like someone else's brand). Run every product shot against that list before it goes near a page.
Match each image to the section it serves
Generating four kinds of image is only half the job; the other half is putting each one where it does its work, and this is the part building Landra forced us to get systematic about, because the generator has to decide not just what to draw but where it goes. The images aren't interchangeable decoration; each maps to a slot in the page's argument.
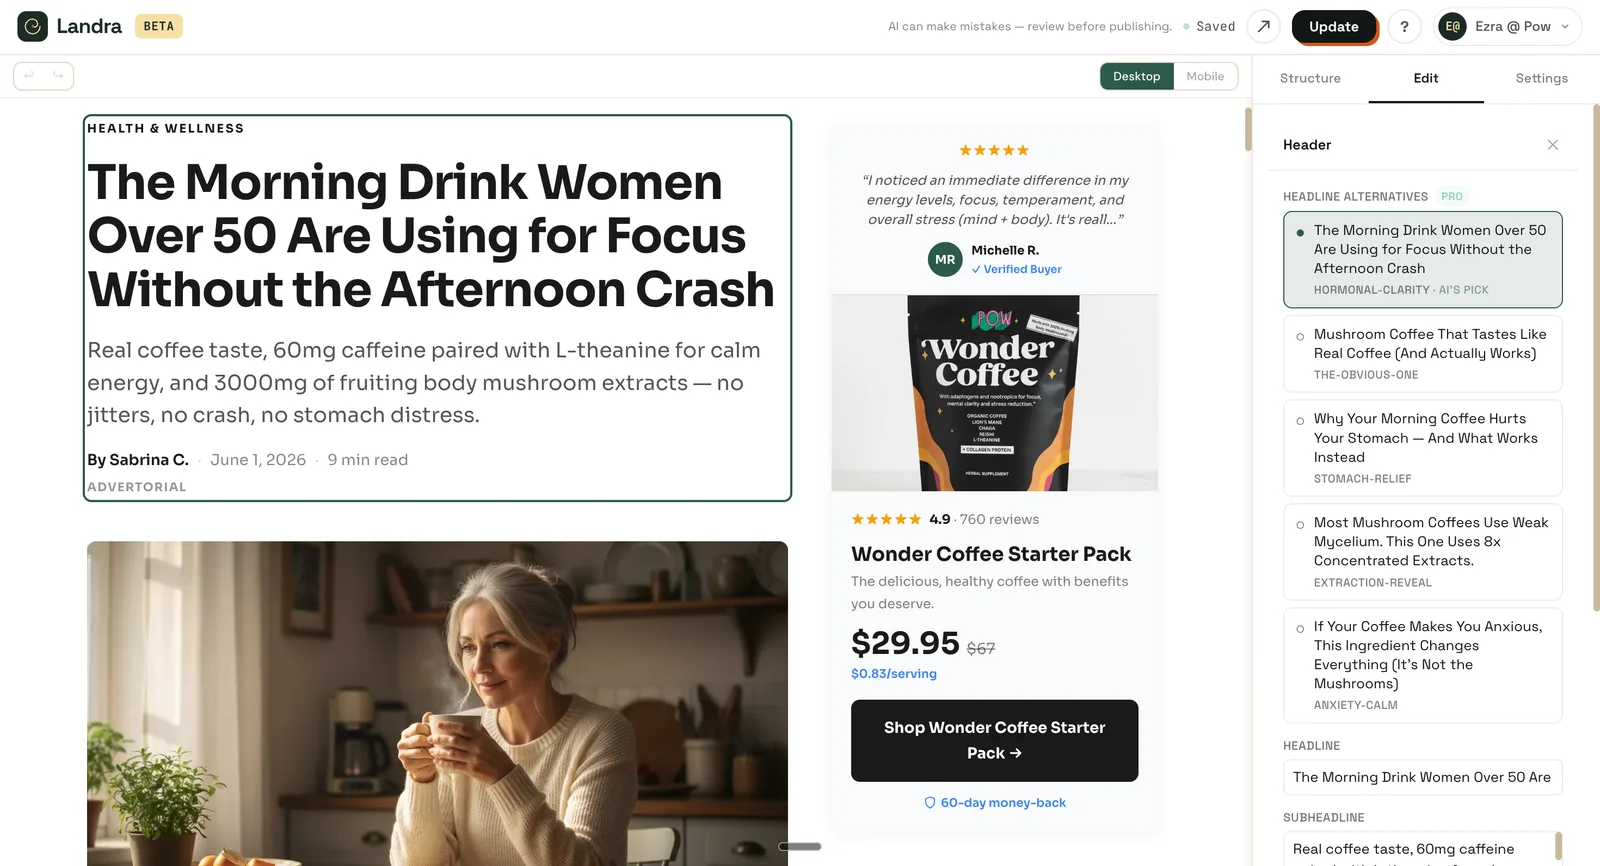
On an advertorial, the problem image rides up near the hook, the payoff image lands where the mechanism pays off, and the product shot is held back until the reader is sold on the outcome. On a listicle, each reason gets the image that matches its angle — a payoff image beside the energy reason, the product shot beside the offer. Drop a pristine product shot at the top of a cold-traffic advertorial and you've led with the ask; lead with the problem image instead and you've earned the read.
This role-matching is exactly what Landra automates. Tell it your product and the audience you're targeting, and it generates the whole page — copy, proprietary DTC components built to convert, and the images each section needs, problem and payoff and lifestyle and product alike, tuned to that reader — then publishes straight to your Shopify domain (or a Landra URL, or clean HTML export). You're not generating images in one tool and guessing where they go in another. The page comes back with each image already in its slot, ready to refine in a click-anything editor.
Where to start
The mistake isn't bad product shots. It's spending all your effort on the product shot and shipping a page with no problem image and no payoff image. So start there: generate the "before" and the "after" for your actual customer before you touch the bottle. Then, for the product shot alone, shoot one sharp source photo, prompt in two halves with the label guardrail, and reject anything that's 90%-right.
From there it's a question of tools and placement: the best AI product-photo tools for DTC brands for what to generate with, and how to create an AI-generated advertorial for where each image goes in the page. Or skip the assembly: Landra makes all four images and the page they live on from your brand URL.
Frequently asked questions
What kinds of images does a DTC landing page need?
Four jobs, not one: an image that dramatizes the problem (the tired "before"), one that shows the payoff (the focused "after"), one that sells the lifestyle the reader wants, and an accurate product shot. Only the last needs to show your packaging — the first three carry the narrative that warms cold traffic, and AI can generate all four.
How do I make AI product photos that look real?
For the product shot specifically, start from a sharp, evenly-lit photo of the real product and pass it to the model as a reference image, so the generator restyles your actual product instead of inventing one. Then write a specific scene-and-lighting prompt, generate several variations, and reject any where the label, cap, or proportions drift. Realism comes from the input and the fidelity check, not a magic prompt.
Do AI images for a DTC brand have to show the product?
No — and most of them shouldn't. The images that warm cold traffic show a person feeling the problem or enjoying the result, often with no packaging in frame. The product shot proves what they're buying; the lifestyle and emotion images make them want it. A page that only shows the bottle is missing three of its four jobs.
Why do my AI product photos get the label wrong?
Because the model is generating a plausible label from scratch instead of reproducing yours. Fix it by supplying a clear reference image of the real product and using a model built for reference fidelity (Google's Nano Banana Pro preserves up to fourteen objects in one workflow). Then inspect every result at full size — text and logos are where AI image models fail most often.
Are AI images allowed for ecommerce and ads?
Generated scenes of your real product, and illustrative lifestyle or mood images, are fine. The lines to respect: do not fabricate before/after results, invent claims an image implies, or pass off generated people as real "customers" or testimonials — the FTC's 2024 Fake Reviews Rule covers AI-generated fakes. Show the product honestly and use people illustratively, and you are on safe ground.